| | | Chỉnh sửa cầu thang trong Revit 2014 |  |
| | | Tác giả | Thông điệp |
|---|
Admin
Admin

Tổng số bài gửi : 1649
Points : 3721
Reputation : 194
Join date : 07/04/2009
 |  Tiêu đề: Chỉnh sửa cầu thang trong Revit 2014 Tiêu đề: Chỉnh sửa cầu thang trong Revit 2014  31/3/2013, 13:57 31/3/2013, 13:57 | |
| | |
|  | | Admin
Admin
Tổng số bài gửi : 1649
Points : 3721
Reputation : 194
Join date : 07/04/2009
| | Tiêu đề: Re: Chỉnh sửa cầu thang trong Revit 2014 31/3/2013, 13:58 | |
| Chỉnh sửa đường đi của cầu thang: Move a RunMoving a run repositions the run by a multiple of the riser height value. Connected components, such as an automatic landing, stay joined, and the height of the stair assembly is maintained.
Select the run component, and drag it to the new location. In the following example, the run is moved to the left.
 | |
| | | | Admin
Admin
Tổng số bài gửi : 1649
Points : 3721
Reputation : 194
Join date : 07/04/2009
| | | | | Admin
Admin
Tổng số bài gửi : 1649
Points : 3721
Reputation : 194
Join date : 07/04/2009
| | Tiêu đề: Re: Chỉnh sửa cầu thang trong Revit 2014 31/3/2013, 14:00 | |
| | |
| | | | Admin
Admin
Tổng số bài gửi : 1649
Points : 3721
Reputation : 194
Join date : 07/04/2009
| | Tiêu đề: Re: Chỉnh sửa cầu thang trong Revit 2014 31/3/2013, 14:01 | |
| Reposition a Winder Run LegYou can reposition a leg in a winder run. Other legs in the winder run will remain in the same position, but steps will be added or deleted from the connected winder legs to maintain the original stair height.
Select the run, and drag the square control to move the leg of the winder to a new position. The placement of this control is determined by the Location Line setting when the run is created. In this example, the location line is Run: Left, so the control is on the left boundary of the run.
 Moving the square control in the top winder leg down, results in a winder run similar to the following: Moving the square control in the top winder leg down, results in a winder run similar to the following:
 Adjust Headroom ClearanceOne way to adjust a stair to meet the headroom clearance requirement is to modify the landing height. Other methods include repositioning a run and balancing the number of treads/risers between runs. Adjust Headroom ClearanceOne way to adjust a stair to meet the headroom clearance requirement is to modify the landing height. Other methods include repositioning a run and balancing the number of treads/risers between runs.
To adjust the landing height, In an elevation view, select the landing, and use the Move tool to change the landing position. (You could also modify the Height instance property for the landing). Notice that the steps adjust between the runs to accommodate the landing height change.
 Modify Actual Run WidthYou can change the width of a run directly in stair assembly edit mode. Modify Actual Run WidthYou can change the width of a run directly in stair assembly edit mode.
Select the run, and drag the arrow shape control at one of the run edges to change the width. Notice that the width of the connected landing component changes as well.
 Reshape a LandingYou can modify the shape of an automatic landing while keeping the runs connected as designed. Reshape a LandingYou can modify the shape of an automatic landing while keeping the runs connected as designed.
Select the landing, and drag the arrow shape controls at the edges to modify the landing size and shape.
 | |
| | | | giangnamqb91
Tổng số bài gửi : 8
Points : 10
Reputation : 0
Join date : 30/07/2014
| | Tiêu đề: Re: Chỉnh sửa cầu thang trong Revit 2014 17/9/2015, 22:05 | |
| Thưa thầy! thầy cho em hỏi là nếu mình muốn chia đôi chiếu nghĩ để làm thêm 1 bậc có được không thầy. em đả thử bằng stair compenent mà không thành công. Mong thầy giúp đỡ ( không sữ dụng lệnh skecth, tại vì em muốn sau khi vẽ xong thì em có thể đánh số bậc được). Em cảm ơn thầy | |
| | | | Admin
Admin
Tổng số bài gửi : 1649
Points : 3721
Reputation : 194
Join date : 07/04/2009
| | Tiêu đề: Re: Chỉnh sửa cầu thang trong Revit 2014 19/9/2015, 14:29 | |
| - giangnamqb91 đã viết:
- Thưa thầy! thầy cho em hỏi là nếu mình muốn chia đôi chiếu nghĩ để làm thêm 1 bậc có được không thầy. em đả thử bằng stair compenent mà không thành công. Mong thầy giúp đỡ ( không sữ dụng lệnh skecth, tại vì em muốn sau khi vẽ xong thì em có thể đánh số bậc được). Em cảm ơ
Bạn nên vẽ bằng Sketch vẫn đánh số bậc được. Bạn đọc bài này Vẽ cầu thang bằng Sketch | |
| | | | Sponsored content
| | Tiêu đề: Re: Chỉnh sửa cầu thang trong Revit 2014 | |
| |
| | | | | | Chỉnh sửa cầu thang trong Revit 2014 | |
|
| Trang 1 trong tổng số 1 trang | |
Similar topics |  |
|
| | Permissions in this forum: | Bạn không có quyền trả lời bài viết
| |
| |
| | Thống Kê | Hiện có 39 người đang truy cập Diễn Đàn, gồm: 0 Thành viên, 0 Thành viên ẩn danh và 39 Khách viếng thăm :: 2 Bots Không Số người truy cập cùng lúc nhiều nhất là 162 người, vào ngày 3/8/2017, 13:30 |
| Statistics | Diễn Đàn hiện có 10566 thành viên
Chúng ta cùng chào mừng thành viên mới đăng ký: cuongvule
Tổng số bài viết đã gửi vào diễn đàn là 3978 in 1497 subjects
|
| Social bookmarking |  
Bookmark and share the address of th3d on your social bookmarking website
Bookmark and share the address of Thiết kế 3D on your social bookmarking website |
|
 feeds feeds | |
| Khách thăm |  |
|


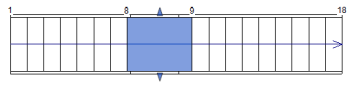
 Edit panel
 (Edit Stairs).In stair assembly edit mode, riser index numbers display as a reference during editing. These numbers indicate the first and last riser in each run. The numbers update dynamically as changes are made to the stair.